
CI/CD with Azure API Management
Posted 29 Jun 2021
Azure API Management is a powerful tool to provide a single API surface for your (micro)service architecture to the outside world. But how does it fit into a DevOps workflow?
There is a guidance document that describes how to develop an API from scratch. It suggests that development of the API is done within the APIM UI in the Azure Portal. From there the API definitions are either exported to ARM templates or exported to a Git repo for promotion to another environment. While this certainly is possible, I found it to be a mismatch for the DevOps workflow.
In a DevOps world, APIs are created and grown with the code that implements them. The people bringing them to production are the same people that develop the APIs. The focus is on reducing duplication and preventing errors by relying on automation instead of human actions.
As services evolve continuously and are pushed to production, changes to the API are lot easier to manage if they are made in one place: the code repository for each service.
A different paradigm
What I'm advocating here is a different development paradigm for Azure API Management, where the APIM becomes a piece of infrastructure and the services publish their API definition directly to the APIM during deployment of the service.
This enables:
- Rolling out each service individually, including its API
- Managing the API definition with the code, not in separate ARM templates or OpenAPI specs.
Limitations:
- This works best if the API calls you expose to the outside world line up with the API calls exposed by your services.
- Generating an OpenAPI spec may not be easy for all tech stacks, including Azure Functions.
As a work around, you can provide the OpenAPI spec in the source repo and maintain it there
A workflow for CI/CD with API Management
APIM is deployed from a central repository.
The infra repo contains the APIM and networking resources. These ARM templates lay the groundwork for the development teams to build on. They deploy the APIM itself, its networking setup, authentication, the APIM portal endpoints and loggers.
APIs are deployed with their service
Each service has a step in its build pipeline that generates an OpenAPI v3 JSON specification for the service API using Swashbuckle CLI. The OpenAPI spec is published as a build artifact. During deployment, the backend for the service is defined in the APIM and the API and its policies are deployed. The deployment is handled by the DevOps tasks by Stephane Eyskens.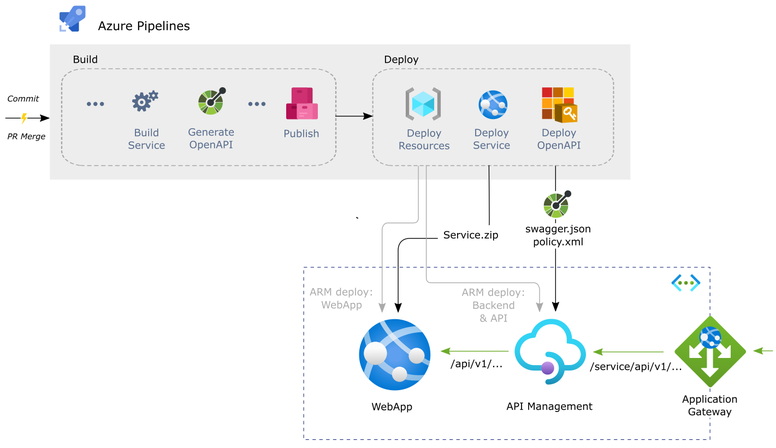

Use a Backend for each API to improve governance and security by abstracting details like the URL and security headers from the API definition and its policies.
The details
Generate an OpenAPI spec from a .NET Core WebAPI
To generate the OpenAPI spec from the built pipeline, Swashbuckle CLI will effectively start your WebAPI in the build pipeline. So, you'll need to make sure your WebAPI has Swagger enabled. Additionally, you should ensure that the application can start without calling all kinds of dependencies which may not be available in your build pipeline. In the pipeline template below, environment variables are set to make all that work.
For example, the ASPNETCORE_ENVIRONMENT variable is forced to Development, because the default (Production) may not have Swagger enabled.
The Swashbuckle CLI tool is then started in the folder where the WebAPI binaries are to produce the OpenAPI spec. The file is generated under the build artifacts folder so it can be easily published as a build artifact.
parameters:
# The full path of the assembly that contains your WebAPI
- name: 'webAppBinary'
  type: string
# The API version
- name: 'version'
  type: string
  default: 'v1'
# The name of file to generate
- name: 'swaggerfile'
  type: string
  default: swagger.json
# The environment to run the WebAPI in
- name: 'environment'
  type: string
  default: Development
steps:
- powershell: |
    dotnet tool update --tool-path . --version 5.* swashbuckle.aspnetcore.cli
    New-Item -Path "$(build.artifactstagingdirectory)/drop/" -ItemType Directory -Force
    $env:ASPNETCORE_ENVIRONMENT="${{ parameters.environment }}"
    $binary = Split-Path "${{parameters.webAppBinary}}" -leaf
    $path = Split-Path "${{parameters.webAppBinary}}"
    $toolsPath = Get-Location
    Push-Location
    cd "$path"
    &"$($toolsPath.Path)/swagger" tofile --output "$(build.artifactstagingdirectory)/drop/${{ parameters.swaggerfile }}" "$binary" ${{parameters.version}}
    Pop-Location
  displayName: 'Generate OpenAPI Spec'
Generate an OpenAPI spec for Azure Functions
At the time of writing it is not so easy to generate an OpenAPI spec from an Azure Functions project. The functions host V1 had built-in support but for V2 and V3, you'll need to add that. The Azure Functions OpenAPI extensions enable the spec to be generated in a similar way to the WebAPI approach but there is currently no CLI tool that can generate the spec on the fly in the build pipeline (see this GitHub issue).
For now the easiest way to manage the API is by adding the OpenAPI extension manually generating the OpenAPI spec and putting that in source control.
For Azure Functions built in .NET 5 with the out-of-process hosting model there is currently no official support for OpenAPI. Microsofts OpenAPI extensions for functions rely on the in-process hosting model to work. There's an interesting post on enabling OpenAPI with Swagger on out-of-process functions.
Publishing an API to APIM
Using Stephane Eyskens tasks for Azure Devops, it is pretty straight forward to publish the OpenAPI spec as an API definition to the APIM.
The spec is included in the build artifacts pulled in for the release pipeline. This particular sample includes a custom policy that binds the API to a specific backend.
steps:
- task: stephane-eyskens.apim.apim.apim@5
  displayName: 'API Management - Create/Update API '
  inputs:
    ConnectedServiceNameARM: 'MyServiceConnection'
    ResourceGroupName: 'rg-apim'
    ApiPortalName: 'my-apim'
    UseProductCreatedByPreviousTask: false
    product1: |
     MyProduct
    OpenAPISpec: v3
    SwaggerPicker: Artifact
    swaggerartifact: '$(System.DefaultWorkingDirectory)/CI/artifacts/swagger.json'
    targetapi: 'my-api'
    DisplayName: 'my-api'
    pathapi: search
    subscriptionRequired: true
    TemplateSelector: Custom
    Custom: |
     <policies>
     	<inbound>
     		<base />
                    <set-backend-service backend-id="my-api-webapp" />
     	</inbound>
     	<backend>
                     <base />
     	</backend>
     	<outbound>
     		<base />
     	</outbound>
     	<on-error>
     		<base />
     	</on-error>
     </policies>
MicrosoftApiManagementAPIVersion: '2018-01-01'If you're using slot swapping for your WebAPI, make sure you apply the API definition after the slot swap has completed. Otherwise the old version may get calls that are not supported yet.
Defining custom policies in the APIM
Custom policies allow you to get the most out of APIM. The workflow I propose here can leverage these policies as well. They can be developed as separate XML files and deployed from the pipeline.
I find VS Code with the APIM extension particularly useful for building APIM policies as it enables a live editing and debugging experience.
Other solutions
The Azure API Management team released this guidance repo on GitHub a while back. It proposes a process to promote changes between environments and roll them out automatically. That's a good thing.
Others have written about deploying APIs to APIM from ARM templates, for example this series of blog posts and this post which uses a tool to extract ARM templates from the APIM.
Using ARM templates is a step in the right direction, as the API is captured in ARM templates in source control and can be deployed automatically and repeatably. By placing each API in a separate template you can roll out changes to services independent of each other. The downside of this is that the API is defined in two places. This means there is a real risk of having a mismatch between the code and the implementation.
The ARM templates for APIs in API management are quite verbose and hard to read, not ideal from a development and maintenance perspective.
There are tools to convert an OpenAPI spec to ARM but, fortunately, there is no need to do that any more because APIM accepts the OpenAPI spec through its REST API. This allows us to cut out the ARM templates in between and allows for the more flexible approach I describe here.
Links
- Eldert Grootenboer's Blog series on APIM CI/CD with ARM templates
- APIM DevOps resource kit (GitHub)
- Adopting a DevOps process in Azure API Management using Azure APIM DevOps Resource Kit
- Build a CI/CD pipeline for Azure API Management (YouTube)
- Azure DevOps APIM extension created by Stephane Eyskens.
- Azure Functions OpenAPI extensions (GitHub)